| CONSERVATION PICTURE FRAMING: MAKE YOUR ARTWORK LAST |
 |
|
Professional framers and archivists have been using preservation methods (also referred to interchangeably as conservation and archival) to frame priceless originals, limited prints, and other important artistic artifacts for decades. While it is certainly necessary to take these advanced steps when dealing with old, fragile, or expensive pieces, the practice of archival framing should not be overlooked for artworks that bear "only" sentimental significance, or inexpensive prints about which the owner cares deeply.
Whether you choose to take your meaningful art to a professional, or undertake the process on your own, framing your pieces using archival methods is something everyone should consider.
The following article outlines the guidelines for conservation framing, as dictated by the related governing bodies, practiced framers, and general common sense.
|
SUMMARY
This article breaks the study of preservation framing into various categories. We will first discuss the reasons for preservation framing. Then we will look at the various materials required to produce a truly archival framed piece. After we cover the actual, archival mounting process, we will finally consider the practice of preserving important documents: encapsulation.
In this article, we are considering only two-dimensional, paper artworks.
| PRESERVE AGAINST |
THE ELEMENTS |
MOUNTING PROCESS |
ENCAPSULATION |
- Light damage
- Humidity
- Poor quality materials
- Self-destruction
|
- Mounting board
- Window mat
- Hinging paper
- Adhesive
- Glazing
- Frame
|
- Four hinging methods:
- Pendant
- T-hinge
- S-hinge
- V-hinge
- Finishing
|
A process used to prepare and preserve important documents, particularly old papers and newspaper, which are prone to desintegrating over time. |
|
| POTENTIAL DAMAGES TO ARTWORK
|
|
|
There are many reasons to preserve your artwork. If it is already a pricey artifact or a limited-edition print from an artist who is fast rising to international fame, it is not difficult to choose conservation framing.
If you plan to re-sell the piece in the future, the way in which it was framed will play a large role in capturing the best price for the artwork. And regardless of future sales, an archival frame job will ensure the piece remains in mint condition for generations.
However, re-sale value in general is only one reason to frame for the long term. There are many natural elements that will wreak havoc on paper artwork if it is not properly encased.
LIGHT DAMAGE
If you have framed anything, or have any interest in art display, you have most likely heard about the dangers of UV light.
Natural sunlight, as well as incandescent bulbs, contains ultraviolet wavelengths. Fluorescent bulbs emit damaging light as well. While the light is partially reflected off the glass of your framed artwork, some is inevitably absorbed through, and will come into contact with the piece.
The most common and recognizable result of light damage in an artwork is fading. When the wavelengths meet the ink of the print or original painting, a reaction occurs that can fade the colors. If you've ever unframed an image partially covered by a mat or frame for a long time (like in the case of a photograph), you may have seen the darker border surrounding the faded image.
Though today many professional printing inks are archival and treated with a UV fade-resistant compound, preservation framing will still aid greatly in the prevention of this effect.
DARK FADING
You may think by packing away your important artwork and photographs, you are protecting them from damage. Unfortunately, this is not the case.
Dark fading is a result of various factors which, while they are not caused specifically by the absence of light, will occur even when images are stored away. In fact, these factors will also effect art that is incorrectly framed and displayed.
HUMIDITY
Humidity is a major damaging factor for artwork. It is particularly an issue in the case of photographs, though originals and fine art prints are not exempt.
As the humidity in the package rises, it can cause the layers of the artwork to soften and become tacky. This glue-like surface will adhere to whatever is covering the picture, be it the previous page of the album, a plastic sheet, or tissue. Once this has occurred, there is no way to save the photo or reverse the damage. This effect highlights the importance of using a mat, which we will discuss further on.
Humidity also encourages the growth of mold on photographs and other paper artwork. While minor cases can be removed and repaired by a conservator, that is a costly process. Mold is also a health risk.
In the case of more modern, digital photographs, humidity can cause the dyes used to print the picture to bleed, resulting in a blurred image.
POOR QUALITY MATERIALS
As we will discuss in the materials sections, low-grade framing products can also cause degradation of artwork, regardless of how or where it is stored.
Mats and mounting boards are common culprits, as they are often made with non-purified paper products which carry lignin, a naturally occurring chemical in wood, causing the covered sections to fade. This same acidic component can turn the art paper brown and brittle, making it fragile and likely to crumble with handling.
SELF-DESTRUCTIVE QUALITIES
In the case of photographs especially, the chemicals used to create the image can in turn damage the print. This self-destructive process is called "autocatalysis." Gases emitted by the development liquids begin deteriorating chemical reactions within the image. When UV light is added, or any of the other factors mentioned above, the effect can be compounded, causing further damage. If proper preservation techniques are observed, any degradation can be almost completely avoided.
|
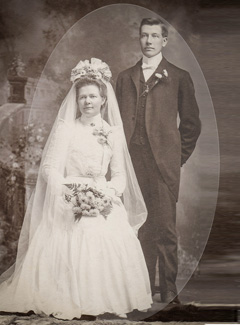
Fading from light damage
|
| THE ELEMENTS
|
|
|
In the following sections, we will look at the individual elements required to correctly and safely frame important artwork. But even if preservation methods delay the process by hundreds of years, artwork created on paper will break down eventually. To prevent this for as long as possible, most framers will highly recommend safely packing away the original (using preservation methods, of course) and displaying a good quality, Giclée reproduction in its stead.
Before going further, there are two important terms that must be understood.
First, what precisely qualifies as "archival" or conservation framing?
In order for a framed artwork to be considered archival, all processes undertaken must be completely reversible. In other words, one must be able to undo whatever was done to the piece without any change or harm coming to the art. This means when the art is removed from the frame, it must have no glue or tape residue, no crops, folds, or creases, and certainly no damage (chemical or otherwise) to the media itself.
Secondly, it is important to understand the distinct difference between "acid-free" framing products, and conservation or archival products.
Acid-free means mats, mounting boards, papers, etc, have gone through a decontamination process which has rendered them pH neutral. Though this will protect your artwork for the short term, acid-free products will still emit harmful chemicals over time, as the pH will begin to destabilize again from this neutral point. (Imagine laser eye surgery: the process will essentially "re-set" your vision, but if you are prone to failing eyesight, it will not prevent future vision loss.)
Conservation products, on the other hand, have far less lignin in them than regular paper products - as little as 1%, while wood products (regular paper) are made up of as much as 30% - and are therefore naturally pH neutral. True conservation products will have a pH value of 7.5 to 9.5, and an alkaline reserve of 1-3% (don't worry, this should be outlined in the stats of any quality brand). Anything outside this range will begin to damage artwork, either within a few weeks, or years.
Now, let us look at the different materials required for any framing process, and the specific statistics required to make them "archival."
|
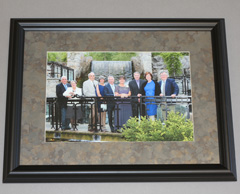
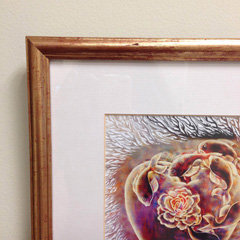
Finished, framed artwork
|
| MOUNTING BOARD
|
|
|
The mounting board or backing board is the rigid surface onto which the artwork will be affixed. Foam board (also called foam core) and corrugated cardboard are commonly used in regular framing, but neither of these are suitable for archival framing.
Acid-free foam board is a good alternative to regular foam board as a mounting board, but only for non-archival framing. Even acid-free, the foam will eventually emit styrene. Corrugated cardboard can also be rendered acid-free, but will begin to give off sulfer oxide. Both chemicals will damage art over time.
The opinion of most professional framers is that conservation-grade matboard is the only perfectly safe option for mounting artwork in archival situations. This is useful, since you will most likely have matboard on hand to create your window mat (next section), anyway.
Conservation-grade matboard usually comes in a 4-ply thickness. This is perfectly suitable for a window mat, but may not be strong enough for heavier artworks, such as those with many layers of paint, or those created on very thick paper. 6- and 8-ply matboard is also available, and though it is not produced in as many different colors, that is not an issue for the mounting board. If you are mounting a drawing on light paper, or similar, the 4-ply will be fine.
A "conservation" rating implies this, but make sure the matboard is made from 100% cotton. We will discuss mats further in the next section.
|
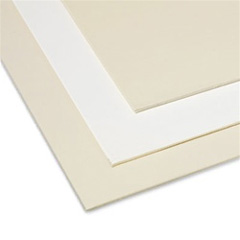
Use conservation matboard to safely mount artwork
|
| WINDOW MAT
|
|
|
Conservation-grade matboard will be made from 100% cotton, or possibly wood pulp. The bleaching process eliminates the small reserves of lignin present in the material. Calcium carbonate is used for this process, and once treated, the newly neutral pulp is called "alpha cellulose."
Your window mat - the bevel-edged border that surrounds and just slightly overlaps your artwork - must also be made from conservation-grade matboard. 4-ply is usually suitable for the window mat, but you may require more thickness if the artwork is considerably raised from the paper.
This will be discussed in more detail in the Glazing section, but suffice to say for now your artwork should never be in contact with the glass or acrylic cover. A double 4-ply mat can help prevent this in the case of thicker paint application, and it is also a visually pleasing effect. If the art is quite raised, however, spacers may be necessary.
Spacers made of thin strips of matboard are a good, inexpensive option, though archival plastic inserts have been produced especially for this purpose. The spacers will be hidden under the lip of the frame, or at least behind the window mat, and in the case of matboard strips, can be stacked as high as required. Thin spacers hidden behind the lip of the frame will also serve to separate art from glazing when no mat is used.
Conservation must also extend to the colored layer of the matboard, and the adhesive used to attach it. Pigments will likely be used in place of dyes to tint the front-piece, as they are more fade-resistant and much less likely to bleed. Adhesives will be free of acids and other damaging chemicals.
|
The window mat serves as a border and barrier
|
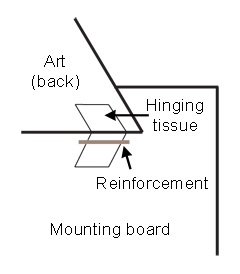
| HINGING PAPER
|
|
|
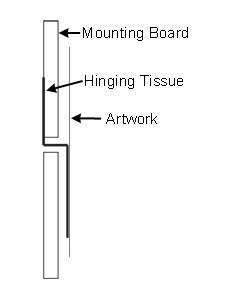
Once the mounting board and window mat are cut to size, the artwork must be adhered to the mounting board. While this is an important step as it prevents the art from slipped down behind the window mat, there is a delicate balance between strength and weakness when it comes to hinging papers.
Linen tape and pressure-sensitive adhesives such as masking tape are popular choices for hinging artwork, but they are not suitable for archival framing. For one thing, the adhesives on them are too strong, and cannot be removed from the artwork without tearing or at least leaving parts of themselves, or a sticky residue, behind. This, as we know, would destroy the archival nature of the artwork.
The tape material itself is also too strong. If the mounted piece were to fall from the wall, the paper artwork would tear before the tape would let go. If the hinging material is very thin, however, it instead of the art will rip on impact, hopefully leaving the piece undamaged.
The best known product to fill these requirements is known as Japanese paper - in actuality a very thin tissue made from pulp that has all the wood removed. The most reliable tissues are made from mulberry or kozo. The mere application of water is enough to tear the tissue, and different plys are available for different artwork. As a rule, the tissue should be the same weight, or less, than the artwork.
The hinging process itself will be discussed in the Mounting the Art section. This section discusses the material, only.
|
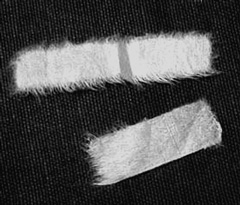
Japanese tissue paper
|
| ADHESIVES
|
|
|
Since Japanese tissue is used to mount the artwork, and not an already-sticky tape, an additional adhesive is required. While white glue, animal glues, and other similar products are quick to prepare and easy to purchase, they tend to break down over time, losing adhesion and damaging the art. They are also difficult if not impossible to remove without leaving a residue behind.
As such, wheat or rice starch paste is the go-to adhesive for mounting archival artwork. Made by cooking the starch with water and allowing it to cool, until it becomes a gelatinous paste, this adhesive is strong, long-lasting, and will disengage from the artwork with the application of water, leaving no residue.
A man-made alternative has been used with considerable success in recent years. Called methyl cellulose, it does not need to be heated, but simply mixed as a powder into water and allowed to thicken. This option has a longer shelf life than wheat/rice paste, does not discolor over time, and resists mould. It is too new, however, for its long term strength to be determined.
Whatever adhesive is used, it must conform to the following parameters:
- Water-based
- Resistant to mold, insects
- Non-staining
- Permanent
- 100% acid free
|
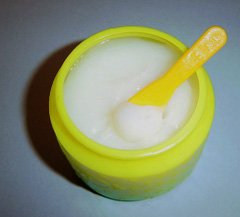
A starch-based, adhesive paste
|
| GLAZING
|
|
|
The last part of the frame contents to consider is the glazing. Suitable archival products are available whether you or your framer choose to use silicate or acrylic glass.
As discussed above, UV and incandescent light that passes through the glass onto the artwork can damage the inks and paper. For this reason, it is important to cover an archival artwork with glazing that has been treated to repel these rays of light. Today, there are various options that do not at all affect viewability.
- Silicate Glass: Silicate or "real" glass can have a UV-resistant coating applied. The thin film may be adhered to the top of the glass sheet, or sandwiched between two thin layers of glass
- Acrylic Glass: With acrylic, the UV-resistant component is mixed in while the glass is being produced.
Both types of glass, when properly treated, can block up to 99% of UV radiation directed at the artwork from light. Professional framers recommend accepting a brand that blocks no less than 90%.
In addition to choosing UV-resistant options, the owner will often also have the choice or regular or non-glare glass. The latter is roughened to a matte finish on the inside of the glass, and reduces the amount of glare caused by light reflecting off the surface, therefore making the artwork easier to view.
For archival framing, never use anything but water and a soft cotton cloth to clean the glazing. If any sprays are used, their chemicals could cause unwanted reactions within the frame.
Another word about light damage: Though the glass, and maybe even the inks used to print the artwork, will block most of the UV rays, light will still degrade the image over long periods of time (generally a century or more). For priceless pieces for which the original must be displayed, it is recommended they be covered with a blackout cloth when not being admired.
|
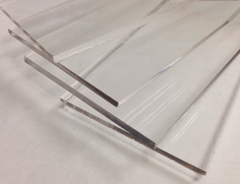
Acrylic plexiglass
|
| FRAMES
|
|
|
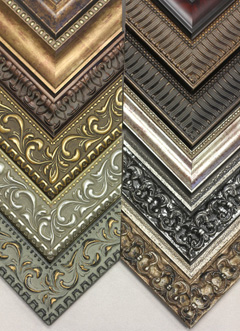
The final piece of the framing puzzle is, of course, the picture frame itself. Good quality picture frames are generally constructed of one of two materials: metal or wood.
If you haven't yet picked a frame, see our useful article all about Choosing the Right Picture Frame.
WOOD FRAMES
We know from previous data that wood is inherently acidic due to naturally occurring lignin. Therefore it stands to reason that a wooden frame, however beautiful and ornate its design and lofty its price, is not an archival product.
Though this is true, there is a relatively simple way to use any solid wood frame for conservation framing without risking the life of your artwork. The exposed wood of the frame - on the underside of the lip, often, and the rabbet - must be covered with an archival quality, acid-free surface, which will act as a barrier between the acidic wood and the clean, archival products.
Mylar, a polyester film, can be used for this purpose. A double coat of polyurethane is also suitable, as is aluminium foil, in a pinch. This protective barrier will prevent chemicals in the wood, which are prone to out-gassing, from reaching and damaging the artwork.
METAL FRAMES
Though you may want to enquire as to any additional coatings or paints, a pure metal frame will not damage your artwork. It is very difficult to securely tape or cover the open back of a metal frame, however, so it is suggested that you have the frame contents - artwork, mounting board, mat, glazing - securely taped all around once the pieces are compiled. This will keep pollutants and insects out of that pristine, archival interior.
Learn more by reading How to Assemble a Metal Frame.
If you are considering a different kind of frame, speak to the framer, a conservator, or do some research to make sure the material is suitable for archival framing.
|
Solid wood picture frame samples
|
| MOUNTING THE ART
|
|
|
In general, the mounting and framing process for archival artwork is not so different from the framing of any other piece. There are, however, a few specifics that should be adhered to (pardon the pun) to ensure the artwork remains viable for decades to come.
The matboard being used as a mounting board should be cut to the exact inside dimensions of the frame, which will be made to the outer dimensions of the window mat (if using) or the artwork (if no mat is used). As mentioned above, 4-ply conservation matboard is suitable for most paper artwork, but heavier pieces may require 6- or 8-ply.
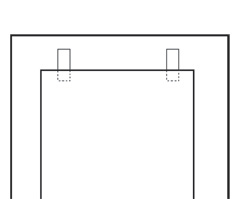
The artwork will be placed in the center of the matboard and hinged using Japanese tissue and wheat starch paste. Never hinge the artwork to the back of the window mat.
Hinges will be placed just a bit inside the top two corners of the artwork, and always to affixed to the back of the piece. Larger artworks may require three or even four hinges placed along the top edge, but more should not be used, nor should additional adhesives be used on the other sides of the art.
The reason for so few hinges has to do with the properties of paper over time. Changes in humidity and temperature can cause the paper - most likely the artwork but also possibly the mounting board - to expand and contract. If the entire top edge of the paper was adhered to the mounting board, and flexing would cause wrinkling and buckling within the frame. Two small hinges prevent this in the case of expansion or contraction.
There are four preferred methods for hinging artwork. If using a window mat, any of the four are suitable. If there is no mat - as is common when framing Victorian and earlier-era artworks or their prints - only method 3 or 4 should be used.
In each method, the paste should be applied only to the bottom 1/4" of the tissue strip (especially where it is attached to the artwork), and allowed to dry until just tacky before applying to the artwork. The goal is to have as little wheat paste as possible on the artwork.
- Pendant Hinge: This simple hinging technique requires most of the tissue strip to be visible on the mounting board. Wheat paste is applied to one end and the strip is affixed to the back of the artwork, with about two thirds sticking out above the top edge. Once this side has dried, apply wheat paste to the other side of the strip and affix this side to the mounting board.
- T-Hinge: The same as a Pendant Hinge, but once the steps above are complete, an extra strip of tissue is laid horizontally across the vertical pieces affixed to the mounting board. In this case, wheat paste will be applied to the whole second strip, on one side.
- S-Hinge: For this method, small slits must be cut in the mounting board, wide enough to slip the tissue strip through. The strip is then adhered to the back of the mounting board above the cut, threaded through, and adhered to the artwork at the appropriate point below the cut.
- V-Hinge: The tissue strip is adhered to the back of the artwork, then folded back on itself. This fold is then adhered to the mounting board at the same level as it was affixed on the art. Reinforce the hinged section by placing a thin strip of tissue across the first strip, just under the fold.
OTHER HINGING OPTIONS
If hinging tissue and adhesive is too much work or not available to you, there are other methods of mounting that will not damage the artwork.
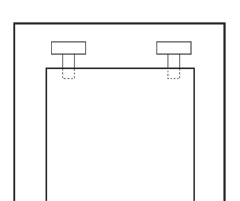
CORNER POCKETS
Yes, these are the same little, triangular pockets that were used in photo albums for generations. To ensure they are archival-grade, they must be made from Mylar, 100% cotton, or Japanese paper. The bottom two pockets may be placed against the corners of the artwork, but the top two must be placed about 1/16" away to allow for movement.
PAPER SUPPORTS
These pieces of paper are adhered to the mounting board at the bottom and sides of the artwork. The top half overlaps the art so it is held in place, but with no adhesive.
These two methods are only viable for matted artwork, as they will be visible on the mounting board next to the art.
Read our general article about Mounting Art in a Frame.
|
Pendant Hinge
T-Hinge
S-Hinge
V-Hinge
|
| FINISHING
|
|
|
Once the art is affixed to the mounting board, the mat may be laid in place. Alternately, the framer may choose to hinge the backside of the mat to the mounting board along one side. This is done using linen tape, which is generally placed along the top edge for landscape (horizontal) pieces and along the left edge for portrait (vertical) pieces.
If spacers are required to hold the mat and glazing away from the artwork, they can be affixed along the sides of the mounting board, preferably before the artwork is hinged. The entire contents can then be placed into the frame.
A second backing board is recommended for extra strength and security against the mounting board. If a wooden frame is used, framer's points or linen tape can be used to seal the space between the contents and the frame. Alternately (or in addition), a dust cover of thin paper can be glued or taped across the back, from one outer edge of the frame to the other.
For more detailed information, read our article Frame Fitting: Securing the Contents of a Frame.
|
Taping the back of the picture frame is one day to seal the contents.
|
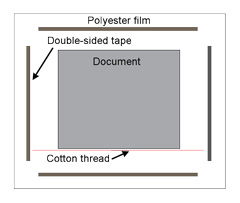
| ENCAPSULATION
|
|
|
(NOTE: This section discusses encapsulation in general and should not be followed as a lone resource when carrying out the process.)
Encapsulation is a common method of preserving important documents for display, such as marriage certificates, newspaper or magazine clippings, letters, or maps.
The document itself first goes through a de-acidification process that will neutralize the acid content of the paper. This is especially important for newspaper which, as anyone who has ever kept a clipping for more than a few months knows, is very susceptible to degradation. This process may involve submerging the document in either an aqueous or solvent-based solution.
Once the paper is ready for packaging, it is sandwiched between two sheets of a polyester film such as Mylar. One sheet is laid on a clean surface, and double-sided tape is placed along all four sides, the corners left open to breathe. The document is then placed on the film. A thin strand of cotton thread may be stretched below the artwork to prevent it from coming into contact with the tape, should it slide down in the package.
The second layer of film is laid on top. With a weight holding the three layers together in the center, the other side of the tape can be bared, and the top layer can be pressed down all around. This sandwich can then be treated as the artwork itself, to be mounted and framed as outlined in the previous section, using only, of course, archival products.
|
The encapsulation process
|
|
While the archival framing process required the proper products, it is really no more complicated or complex than regular framing. If you want to keep your artwork in mint condition forever, or are unsure what you will do with it in future, preservation framing is a good way to keep your options open.
Have questions about the framing process, or any of our services or products? Don't hesitate to contact us. Our knowledgeable staff is always happy to assist with answers, advice, or suggestions.
|
|
© 2002-2024 - KeenART Media Ltd.
|
|
| |
|